

So you’re lookin’ to turn your backyard into a cozy hangout spot, eh?
Well, buildin’ a DIY fire pit area is a great way to do just that.
It’s like addin’ a warm hug to your outdoor space – perfect for relaxin’ with friends and family, or just enjoyin’ some solo time under the stars.
Check out this video of Colin, our resident fire pit guru, as he walks you through the process.
He’s got the lowdown on how to build a fire pit that’ll make your outdoor space the envy of the neighborhood.
Grab a cup of coffee, sit back, and let’s get started!
Step 1: Mark Your Layout
Alright, let’s get this fire pit party started!
Before we start diggin’, we gotta figure out where this thing is goin’.
Grab a rope, hose, or even a hula hoop (we won’t judge) and mark out a circle that’s gonna be the epicenter of your backyard gatherings.
- Decide on the Size: Think about how many buddies you’re gonna invite over for s’mores and tales of adventure. A good rule of thumb is about 36-48 inches in diameter. That’s like, a decent-sized circle for a small group of folks.
- Get Your Circle On: Use that rope or hose to draw a circle on the ground. If you’re feelin’ fancy, grab some spray paint and make it official.
- Stake Your Claim: Mark the center of that circle with a stake or a flag. This is like, the spot where all the magic happens, bro.
- Don’t Blow It Up: Before you start diggin’, make sure you’re not gonna hit any underground pipes or wires. We don’t want no accidents or angry utility folks showin’ up at your doorstep.
- Tweak It: Take a step back, grab a cold one, and make sure everything looks good. Adjust that circle as needed, and you’re ready to rock ‘n’ roll!
Now that you’ve got your layout marked, it’s time to start diggin’!
Safety Check!
Howdy there, pal! It’s me, Smokey!
Before you start enjoyin’ your new fire pit, make sure you’ve done your due diligence to prevent any ol’ house fires or I’m gonna yell at you for having a Yosemite-sized campfire in your backyard!
- Give it a good ol’ inspection: Take a gander at your fire pit and make sure it’s level, secure, and safe to use. You don’t want any accidents or mishaps ruinin’ your fun!
- Test it out with a small fire: Light a small fire and see how it performs. This’ll help you make sure everything is workin’ just right.
Remember, only you can prevent fires! So be careful, be responsible, and have a great time enjoyin’ your new fire pit!
Smokey’s Favorite Safety Tips:
- Keep a fire extinguisher or a bucket of sand nearby, just in case!
- Make sure to fully extinguish the fire when you’re done using it.
- Keep a the pit safe distance from flammable materials, like leaves or branches.
Step 2: Excavate and Backfill
Time to break out the shovel and get down to business!
This step’s all about excavatin’ the area where your fire pit’s gonna sit, and then backfillin’ it with some good stuff to keep things stable.
- Dig a hole that’s just right: You’re lookin’ for a spot that’s about 2-3 inches deep, and slightly larger than your fire pit ring. Don’t worry if it’s not perfect – we’re goin’ for a rustic vibe here, not a precision-engineered hole.
- Get rid of the dirt: Haul that dirt away, or save it for later use (you never know when you might need it). Just make sure the area’s clear and level.
- Add a layer of gravel: This is where things get interesting. You’re gonna add a layer of gravel to help with drainage and stability. Think of it like a little insurance policy for your fire pit.
- Backfill and compact: Fill in the rest of the hole with more gravel or decomposed granite, and then compact it down with a hand tamper or plate compactor. You want it to be solid, but not too tight – we’re goin’ for a smooth, even surface.
@wonhaus POV: you spend two weekends doing this so you could relax all summer long 😌 Spontaneously created this fire pit area after uncovering the pathway and it’s been one of our favorite projects to do AND enjoy!! Lmk if you have any questions 🙂 #backyardmakeover #diyhomeprojects #firepitproject
♬ You Make My Dreams (Come True) - Daryl Hall & John Oates
If you’re lookin’ to build a sweet fire pit for those chilly lakefront nights or mountain gatherings, we’ve got just the thing.
Our DIY fire pit kits are perfect for folks around Coeur d’Alene, Sandpoint, and Spokane.
We deliver ’em locally, so you can get started on your project without havin’ to haul a bunch of heavy stuff up the highway.
Our kits include everything you need to build a fire pit, from the ring to the stones, and are designed to be easy to assemble.
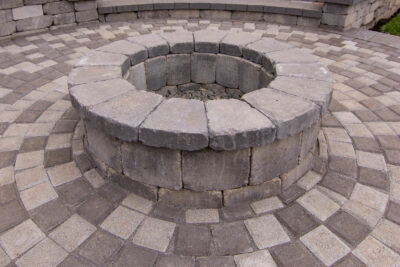


Step 4: Add 1-2 Additional Courses
Time to bring out the big guns – or rather, the big stones!
You’re gonna add a layer (or two) of stones to keep your fire pit rock-solid.
- Add a layer of stones: Fill that pit with a 2-inch layer of stones. You can use fieldstones, flagstones, or whatever kind of stone tickles your fancy. Just make sure they’re not too big or too small – you want ’em to fit snugly together like a puzzle.
- Stagger the joints: As you add more layers of stones, make sure to stagger the joints. This means that the stones in the next layer should overlap the stones in the layer below, like a brick wall. This will help keep everything stable and prevent any ol’ stones from fallin’ out.
Now you’re gettin’ somewhere! Your fire pit’s startin’ to look like a real fire pit, and not just a hole in the ground.
Keep stackin’ those stones, and you’ll be enjoyin’ s’mores in no time!


Step 5: Enjoy Your Fire Pit
It’s finally time to bring the heat!
Place that fire pit ring or insert in the center of the pit, and get ready to make some s’mores, tell some ghost stories.
- Drop in the ring: Carefully lower that fire pit ring or insert into the pit. Don’t worry if it’s not perfect – a little bit of wonkiness just adds to the charm, right?
- Level it out: If you’re using a metal ring, make sure it’s level and secure. You don’t want your fire pit to be like a drunken uncle at a wedding – all wobbly and prone to sudden collapses.
And just like that, you’ve got yourself a fire pit!
Now go forth and roast some marshmallows.
You’ve earned it!
Final Check
- Inspect your fire pit to ensure it’s level, secure, and safe to use.
- Test the fire pit by lighting a small fire.